I hope everyone's Easter was good. I had a great Easter even though our usual get together was not able to happen. It gave me more time to reflect on Easter itself and what Easter is all about. I do a Facebook Live video every Sunday night and was debating on whether to cancel since it was Easter but decided since everyone is having to stay home at this time in life, I would go ahead with my video. I choose the stamp set "Hold On To Hope" by Stampin' Up! for the occasion. Here are the cards I made and the instructions on making them.
I ended up using every stamp from the set on these three cards. I also decorated an envelope to go with them. If you would like to see the Facebook video on making these cards you can go to my Delightful Fun page or click
here.
The first card I made was the "God Is Love" card. I used Whisper White, Gorgeous Grape and Purple Posy. Everything except for the butterfly was stamped in Gorgeous Grape. The butterfly was stamped in Purple Posy. Here is the card and the paper measurement are below it.
Whisper White - cut the card base at 4 1/4" x 11" (fold in half)
cut a matte piece at 5" x 3 3/4" (this is also the piece that I embossed using the Subtle embossing folder.
Gorgeous Grape - cut one at 5 1/4" x 4" and one at 3 1/4" x 3 1/4"
Purple Posy - cut one at 5 1/8" x 3 7/8" and one at 3 1/8" x 3 1/8"
Best Dressed Designer Series Paper - cut one at 3" x 3" and one at 2 1/2" x 6" for the flap on the envelope.
Purple 3/8" Tricolor Ribbon - approx. 12 inches long
Stamp the inside of the Whisper White card base with the corner border stamp and the Hold On To Hope stamp using Gorgeous Grape ink. Stamp the butterfly with the Purple Posy ink. Set card base aside.
Layer from top to bottom like this - (square cuts) designer paper, purple posy, gorgeous grape.
Set aside!
Next layer the embossed whisper white, purple posy, gorgeous grape. Wrap your ribbon around these three mattes and tie a knot. This can now be attached to the card base.
Attach the 3 square mattes with dimensionals. The God Is Love banner is stamped on a scrap piece of whisper white and cut out using the Crosses of Hope Framelits.
Card #2 can be used as a Birthday Card, Congratulations Card or anything to celebrate someone. For this card I used Early Espresso, Daffodil Delight, Melon Mambo and Whisper White card stock. The ink I used was Early Espresso and Melon Mambo. I used the framelit dies from Barn Door stamp set for the flowers.
Early Espresso - cut base of card at 4 1/4" x 11 (fold in half) and one piece at 3 1/4" x 3 1/4"
Daffodil Delight - cut one at 4" x 5 1/4"
Melon Mambo - cut one at 3 3/4" x 5"
Whisper White - cut one at 3" x 3" and one at 4" x 5 1/4" for inside of card
Stamp the whisper white inside of card piece with the corner border stamp and the cross stamp in Melon Mambo ink. Be sure to stamp the cross off once on a scrape piece of paper before stamping on the card stock. (Ink up stamp, stamp on scrape paper the stamp on Whisper White to give it a lighter stamped image.) Stamp the "You" on the cross using Early Espresso ink. Attach this to the inside of the Early Espresso card base. Set aside.
Stamp the 3" x 3" Whisper White with the flowering vine stamp and the Celebrating God's creation stamp in Early Espresso ink. I die cut flowers using the sliding door framelits and glued them to the flowers on the flowering vine stamp. I did these from a scrape piece of Melon Mambo card stock. You can attach this to the square piece of early espresso card stock. Set aside.
Layer your Melon Mambo on to your Daffodil Delight, I cut a piece of Daffodil Delight ribbon, approx. 5- 5 1/2" and putting glue dots on each end of the ribbon, attached it diagonally to the bottom right of this 2 layer matte.
I then attached the square mattes to the middle of the large mattes using dimensionals. Next I wrapped another piece of Daffodil Delight ribbon to the top left corner of the card, again attaching it using glue dots. I then made a bow and attached it with a glue dot.
You can now attached to the card base.
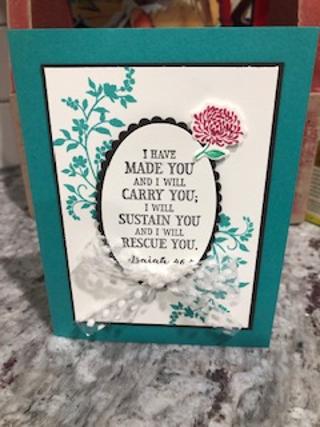
Card #3 is the Isaiah 46:4 verse. For this card I used Bermuda Bay, Early Espresso and Whisper White card stock and Bermuda Bay and Early Espresso ink. For the flower I used Stampin' Up!'s Stampn' Write pens in Call Me Clover and Lovely Lipstick colors. I colored straight on to the stamp, stamped it on to a scrape piece of Whisper White and cut out using the Crosses of Hope Framlits.
I stamped the verse on a scrape of Whisper White and die cut out using the "Layering Oval" dies. I also die cut a Early Espresso scalloped edge oval to go under the white.
Bermuda Bay - Cut one at 8 1/2" x 5 1/5" for card base. Fold in half.
Early Espresso - cut one at 3 3/8" x 4 5/8"
Whisper White - cut one at 3 1/4" x 4 1/2" and one at 5 1/4" x 4 for inside of card.
Stamp the flowering vine stamp on both Whisper White pieces of paper. On the small piece of card stock stamp so that the ends of the vines are going towards the middle of the paper. It doesn't matter if they overlap because they will be covered with the sentiment matte. The inside card stock can be stamped more in the corners leaving room to write.
The only thing that I put dimensionals on is the Early Espresso die cut oval and the die cut flower. Attach Polka Dot Tulle Ribbon bow using a glue dot,