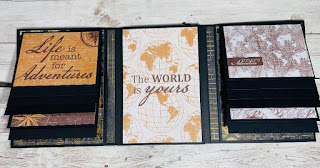
As promised from my Facebook Live last night, I am here this morning to give you the measurements of the photo album I made. I am so sorry that the designer paper and stamp set I used are sold out, but you will be able to decorate this little album any way you want. It is a fast and easy gift for someone special either with added pictures or without.
Let's get started.
You will need 7 sheets of 8 1/2" x 11" cardstock. Then you will just need designer paper and some ribbon to decorate it how you want. I made the measurements so that Memories & More card packs from Stampin' Up! will fit. They make decorating fast and easy.
NOTE: Just a note to toot Stampin' Up!'s cardstock. I pulled out some cardstock that came from a well know craft store and when scoring it, it began ripping and falling apart. Stampin' Up! cardstock does not do that. Sometimes you never realize how wonderful Stampin' Up!'s products are until you see it for yourself.
For the outside, you will cut 2 pieces at 6 1/4" x 10 1/8"
score each piece at 4 13/16" (4 3/4" plus 1/16") and 5 5/16" (5 1/4" plus 1/16")
For the inside middle, you will cut 2 pieces at 6 1/4" x 8 1/2"
score each piece at 4 1/4"
For the 2 side waterfalls, you will cut 12 pieces at 4 1/4" x 3 3/4"
on the 3 3/4" side, score at 1/2"
Now to put it all together (for video click
HERE). You will take the outside pieces and attach the left flap of one to the right flap of the other to make a 3 section folder.
For the inside middle piece, you will attach the left side of one to the right side of the other to make a 3 section folder.
AT THIS POINT YOU MAY WANT TO START DECORATING BEFORE PUTTING ANYTHING ELSE TOGETHER!
This inside 3 section folder will then get attached to the middle section of the outside folder.
For the photo waterfalls on each side, I first start at the bottom and work my way up. Line up the first one where you want it towards the bottom of the page. Attach the 1/2" flap to the page then line up the next right above that one and attach that flap, etc. until you have 6 on each side.
Finish decorating.


No comments:
Post a Comment