Monday, June 22, 2020

3D Mixture

For my Sunday night Facebook Live I decided to change it up a bit and instead of going with 3 cards, I thought it would be fun to throw in a couple of 3D projects.  I also wanted to show how great Memories and More could be for either scrapbooking, card making or many other projects.  As promised on my live, here are the measurements for the cards.  To see how I put them together, please watch my video on my Facebook Page "Delightful Fun by Diana Sanchez".  You can watch my lives every Sunday night at 8:00 pm Central Time.

Post It Note Holder using Stampin' Up!'s Beautiful World Bundle


Using a 12" x 12" piece of card stock, the base of this holder will need a piece cut at 5 3/4" x 12"
On the 5 3/4" side, score at 1/2", 1", 4 3/4" and 5 1/4"
On the 12" side, score at 2", 2 1/2", 6", 9 1/2", 10 1/2" and 11 1/2"
Cut off side pieces as shown above.
Cut a 1 1/2" piece off of the scraps you just made and score it at 1/2" and 1".
Your designer paper will be cut at 3 1/2" x 3 1/4" and 3 1/2" x 1 3/4"
I used Very Vanilla Cardstock and World of Good Specialty Designer Series paper and the Old World Paper 3D Embossing Folder

Memories and More Card using Stampin' Up!'s World Of Good Memories and More Card Pack


All I did on this card is cut down one of the Memories and More cards to fit my 5 1/2" x 8 1/2" (folded in half) card base.  I stamped it using the Beautiful World stamp set and put a sticker from the Memories and More card pack on the front.


Fun Fold Card using Stampin' Up!'s Daisy Lane and Tasteful Touches Stamp Sets


 Just Jade Cardstock - 4 1/4" x 11" scored at 2 3/4" and 8 1/4"
3 pieces of Just Jade Cardstock - 1" x 3 3/4"
Whisper White Cardstock for inside - 4" x 5 1/4"
Flowers For Every Season Designer Paper - 2 @ 2 1/2" x 4" and 3 @ 3 1/2" x 3/4"
Punch a 2 1/4" circle from Just Jade Cardstock
Punch a 2" circle from Whisper White Cardstock
Stamp and punch out 2 daisies using the Daisy Lane Stamp Set and the Medium Daisy Punch
I dabbed the center of the flower with a sponge dauber and Cinnamon Cider ink.

Card in a box using Daisy Lane and Timeless Tulips Stamp Sets and Daisy Punches


Cut a piece of Whisper White Cardstock to 11 1/2" x 4 1/4"
Score on the 11 1/2" side at 2", 5 1/2", 7 1/2" and 11"
Score on the 4 1/4" side at 2" all the way down to the 7 1/2" mark the skip the 3 1/2" section and score on the last 1/2" part.
Watch my Facebook video for more explanation.
Matte for the bottom in Misty Moonlight Cardstock - 1 @ 3 1/2" x 2" and 2 @ 1 3/4" x 2" 
Back Matte - 3 1/4" x 4"
Matte for top sides in Bumble Bee Cardstock - 1 @ 3 1/4" x 1 3/4" and 2 @1 3/4" x 1 3/4",
Front Matte - 3 1/4" x 1 3/4"
Sentiment - 2 1/4" x 1/2"
Top Flowers for Every Season Designer Paper - 1 @ 1 5/8" x 3 1/8" and 2 @ 1 5/8" x 1 5/8"
Whisper White Cardstock - For Back 3" x 3 3/4"
Inside strips in Just Jade cardstock - 4 1/2" x 1 1/2", score on 4 1/2" side 1/2" on each side
Small strips of Just Jade for flower stems 
I stamped and punches both sizes of daisies with Bumble Bee ink on both Bumble Bee Cardstock and Whisper White Cardstock.  The sentiment is stamped in Cinnamon Cider Ink and same color was used for daisy centers with a sponge dauber.

SUPPY LIST


Monday, June 15, 2020

Inking Technique Cards

I was working on some different inking techniques that I had found on Pinterest.  I needed to come up with a few for my Facebook Live.  Well there are quite a few different techniques out there.  Some that I tried work and others were a big flop.  These are the 3 I stuck with.  I love the light house card.  I totally copied that one off of someone on Facebook.  The stamps used are different but the background the same.
Here are the cards and the paper measurements for them.  You can see my Facebook live video on making them by clicking HERE.  Join me every Sunday evening at 8:00 p.m. Central to see what 3 cards I come up with and if you share the video you will go into a drawing to win those 3 cards.

Happy Card Making!!!


Free As A Bird Stamp Set by Stampin' Up!

Mango Melody Cardstock - 5 1/2" x 8 1/2" Folded in half for card base
Terracotta Tile Cardstock - 5 1/4" x 4"
Whisper White Cardstock 3/14" x 4 1/4" and 5 1/4" x 4" for inside card
Polka Dot Tulle Ribbon - 24"
Pearl Basic Jewels
Ink Used - Terracotta Tile and Melon Mambo


Dandelion Wishes Stamp Set by Stampin' Up!
Pear Pizzazz Cardstock - 5 1/2" x 8 1/2" Folded in half for card base
Bermuda Bay Cardstock - 5 1/4" x 3 3/4"
Water Color Paper Cardstock - 5" x 3 1/2"
Whisper White Cardstock - 5 1/4" x 4" for inside card
Stampin' Markers - Pear Pizzazz and Bermuda Bay
Ink Used - Pretty Peacock
Rhinestone Basic Jewels


Sailing Home Stamp Set by Stampin' Up!
Crumb Cake Cardstock - 5 1/2" x 8 1/2"  Folded in half for card base
Whisper White Cardstock - (2) 5 1/4" x 4" one for the inside of card
Crumb Cake Scrap - approx. 1 1/2" x 3/4"
Stitched Nested Label Dies
Subtle Embossing Folder
Inks Used - Pool Party, Pretty Peacock, Crumb Cake and Early Espresso


SUPPLY LIST


Monday, June 8, 2020

Jar of Flowers

Temperatures are on the rise in Texas.  I had a good weekend even though temps were in the 90's.  Saturday was one of my grandson's 10th birthday and Sunday was a fun sitting in the pool day.  Now that is the was to handle the hot weather.

Sunday was also a day for mason jars.  I love mason jars and have them around the house.  They are great for holding silverware at get togethers and great for stamping.  Although my stamping jar may not be a "mason" jar, it is still perfect for holding all the different bunches of flowers in the Stampin' Up! stamp set "Jar Of Flowers".

I finished up my weekend by having my Sunday night Facebook live and making these 3 cards using the Jar Of Flowers stamp set along with a few others for the sentiments.  Here are the measurements for the 3 cards and below that is a list of everything used for the cards.

If you would like to see the catalog in full, go to delightfulfun.stampinup.net.  You can see my live video at my Facebook page Delighful Fun by Diana Sanchez and please join me every Sunday night at 8 p.m. Central to see some new cards.

Designer Paper used for all 3 cards is from the "In Good Taste" package.
Did you know, you can save 10% by ordering the Jar Of Flowers Bundle (stamp set and punch)?
See below cards for link to order it.

Early Espresso Cardstock - 4 1/4" x 11" (card base)
Wood Grain DSP - 1 3/4" x 4" and 3/4" x 4" (3/4" piece is for inside of card)
White Wall Texture DSP - 3 1/2" x 4" and 3" x 1/2"
Whisper White Cardstock - 4" x 5 1/4" (for inside of card)
Early Espresso Faux Suede Trim Ribbon
Sentiment is from the Floral Essence Stamp Set
Flowers were colored with Stampin' Blends and then hand cut out.
Jar was punched out using the "Jar" punch
Everything was stamped with Memento Black Ink.  Pool Party in was added to inside of jar.


Highland Heather Cardstock - 5 1/2" x 8 1/2" (card base) and 3" x 3 1/2"
Wood Grain DSP - 5 1/4" x 4"
Whisper White - 2 7/8" x 3 3/8"
Purple Violet Tri Color Ribbon
Sentiment used is from the "Timeless Tulips" Stamp Set
Stamp flowers with Memento Black Ink and sentiment with Highland Heather ink.
Color flowers using Stampin' Blends


Basic Gray Cardstock - 4 14" x 11" (card base)
I used a piece of the DSP that was gray on one side and had the brick tiles on the other.
Brick DSP - 3 1/4" x 3 12"
Gray DSP - 3 1/4" x 1 3/4" and 3/4" x 4" (for inside of card)
Poppy Parade - 1/2" x 5 1/4"
Whisper White - 4" x 5 1/4" (for inside of card) and some scraps for sentiment
Daffodil Delight Ruched Ribbon
Sentiment is from the "To A Wild Rose" Stamp Set
Everything was stamped with Memento Black Ink and cut out by hand.  Flowers and stems were colored using Stampin' Blends

Supply List
Note:  The Call Me Clover Stampin' Blends have retired but I add a few different greens below that would work great.
June 2020 is a perfect time to purchase this Bundle.  If you sign up to be a Demonstrator in the month of June, you can get $125 in merchandise for only $99 plus you can get this Jar Of Flowers Bundle (or any other of our Punch or Dies Bundle) for free.
Call me now for more information:  915-443-0011


Monday, June 1, 2020

Tasteful Touches Card Samples

Tasteful Touches Stamp Set from Stampin' Up! is definitely going to be one of my favorite new stamp sets.  It is in the 2020-2021 Stampin' Up! Annual Catalog and is available to order starting June 3, 2020 through May 3, 2021.
Here are 5 cards that I made using this set along with a few other Stampin' Up! items.  See a list of every thing used at the bottom of this page.
You can watch the Facebook Live video where I made these first 3 cards by clicking HERE.


Bermuda Bay - 5 1/2" x 8 1/2" (base of card)
Whisper White - 5 1/4" x 4"
Poppy Parade - 4 3/4" x 3 1/2"
scraps of Whisper White
Poppy Parade is embossed from the Tin Tile Folder
1/4" Crinkled Seam Binding Ribbon
Ink Used - Bermuda Bay and Poppy Parade


Basic Black - 5 1/2" x 8 1/2" (Card Base) and 3" x 4"
Magenta Madness - 5 1/4" x 4" and 2 3/4" x 4"
Whisper White - 2 3/4" x 2 1/2"
Emboss the 2 3/4" x 4" Magenta Madness using the Scripty Folder
Ink Used - Memento Black


Misty Moonlight - 5 1/2" x 8 1/2" (Card Base)
Flowers For Every Season Designer Series Paper - 5 1/4" x 4"
Scrap of Misty Moonlight and Very Vanilla for cut outs using the Layering Oval Dies
Ink Used - Night of Navy


Cinnamon Cider - 5 1/3" x 8 1/2" (Card Base) and 3 1/2" x 2 1/4"
Whisper White - 5 1/4" x 4" and 3 3/4" x 2 1/2"
Flowers For Every Season Designer Series Paper -5" x 3 3/4"
Ink Used - Soft Suede


Whisper White - 5 1/3" x 8 1/2" (base of card) and 3 1/2" x 2 3/4"
Magenta Madness - 2 3/4" x 4" embossed with the Scripty Folder
Basic Black - 4" x 3" and 1" x 5 1/4"
Magenta Madness 1/4" ribbon


SUPPLIES USED


Monday, May 25, 2020

3 Masculine Cards-May 25, 2020

Father's Day is right around the corner so instead of tulips and daisies for my Sunday night live, of course, I did some Masculine Cards.  It seems like there are never enough of those which I am not sure why since we all have some guy in our life.  It could be a father, husband, son, step-son, son-in-law, nephew, cousin or friend and I'm sure I forgot someone.  Click HERE to see my Facebook Live Video on making these 3 cards.  (Watch my live videos at my "Delightful Fun by Diana Sanchez" page every Sunday night at 8:00 p.m. Central).


This 1st card I did is using the Geared Up Garage Stampin' Up! stamp set and dies.
You will need:
Call Me Clover Cardstock - 4 1/4" x 11" fold in half for card base
Night of Navy Cardstock - 5 1/4" x 4"
Whisper White Cardstock - 3 3/4" x 5" and 5 1/4" x 4" for inside of card
scraps of Night of Navy and Whisper White cardstock
Ink used is Night of Navy


This 2nd card can be used for many different occasions for someone you care very much about.  This card is made using the Sailing Home Stampin' Up! stamp set and dies.
Night of Navy Cardstock - 5 1/2" x 8 1/2" fold in half for card base
Crumb Cake cardstock - 5 1/4" x 4"
Whisper White cardstock 5" x 3 3/4"
Scraps of Whisper White and Night of Navy
Small piece of Burlap Ribbon
Ink used is Night of Navy


Here is a good masculine birthday card.  You can easily change the sentiment and make it into an any occasion card.  For this last card I used the Waterfront Stampin' Up! stamp set and I got the sentiment from the  Special Occasions stamp set.
Balmy Blue card stock - 5/12" x 8 1/2"
Night of Navy cardstock - 5 3/8" x 4 1/8"
Whisper White cardstock - 3 3/4" x 5"
Ink used is Night of Navy, Balmy Blue, Call Me Clover and Shaded Spruce

If you would like to order any of the items used in these cards you can check availability by clicking on the pictures below or go to my website www.delightfulfun.stampinup.net.


Monday, May 18, 2020

Not just for Kids Cards

The animal stamp sets that Stampin' Up! comes up with really seem to speak to me in one way or another.  My granddaughter loves her horses and although she is more of a horse person and not so much unicorns, I still had to have the "Leave A Little Sparkle" unicorn stamp set because I know how many little girls love unicorns.

The same goes with the "Dino Days" stamp set.  Four of my grandsons were so much into dinosaurs and knowing how many little boys (and girls too) love dinosaurs, I thought this would be the perfect stamp set so that I can have cards on hand for those birthday party needs.

Now this last stamp set "Special Someone" was all for me.  I loved the little Raccoon holding a flower or balloon and now since I have the stamp set, I love the squirrel and mouse just as much.  I have also been able to use the sentiment with many other different stamp sets.

I hope you enjoy these cards as much as I did.  I didn't realize until after my Sunday night Facebook Live that the card measurement I had done (and misplaced) were for my Card Class cards instead.  So here are the measurments as promise.  If you would like to watch the video for this card, you can go to my Facebook page "Delightful Fun by Diana Sanchez or click HERE.

(Join me for my Facebook Lives every Sunday night at 8:00 p.m. Central Time)


Leave A Little Sparkle Stamp Set
Pineapple Punch Card Stock - 5 1/2" x 8 1/2" Fold in half
Early Espresso Card Stock - 5 1/4" x 4"
Shimmery White Card Stock - 5 1/4" x 3"
Whisper White - 5 1/4" x 4" (for inside of card)
I stamped the unicorn and sentiment on the Shimmery White and embossed it in gold.
I also embossed the stars on the Early Espresso.
I stamped the stars down the left side on the Whisper White in Pineapple Punch ink.
I added a bow made in Copper Trim ribbon to the front.


Dino Days Stamp Set, Dino Dies and Dinoroar Designer Series Paper
Call Me Clover Card Stock - 5 1/2" x 8 1/2" Fold in half
Whisper White Card Stock - 2 1/2" x 4" and 5 1/4" x 4" for the inside
Pineapple Punch Card Stock - 4 1/4" x 1"
Designer Paper - 4 1/4" x 3/4"
I die cut the pteranodon from the designer paper but it could also be stamped the cut out.
I rounded the 2 bottom corners of the 2 1/2" x 4" using the Detailed Trio Punch


Someone Special Stamp Set
I used Stampin' Up! Note cards and Envelopes for these 3 cards
The mattes are in Pineapple Punch, Lovely Lipstick and Bermuda Bay Card Stock - 3 1/4" x 4 3/4"
Whisper White - 3 pieces at 3" x 4 1/2"
The sentiment is written on a strip of Whisper White 1/2" wide
The matte for the sentiment is a strip of coordinating card stock 3/4" wide
I stamped the Raccoon in Early Espresso for the outline and Sahara Sand for the fill in.
I stamped the Squirrel in Soft Suede for the outline and Sahara Sand for the fill in.
I stamped the Mouse in Memento Black for the outline and Smokey Slate for the fill in.
The balloons were stamped in the same color ink as the card stock used.

SUPPLIES USED


Monday, May 11, 2020

Bundles-Daisy Lane, Floral Essence, Free As A Bird

We have about 3 more weeks before Stampin' Up!'s new Annual Catalog (available June 3, 2020) comes out which means many things will be retiring.  The 3 bundles featured here will be retiring BUT fortunately the stamp sets, punches and dies will not be retiring.  They will still be available in the new catalog but you will no longer be able to buy them as a bundle with the 10% discount. Also retiring are the 5 colors of cardstock used for these cards.  We will be getting 5 new colors in the new catalog.  Click HERE to view the current catalog.

Below are the cards that I made on my Sunday night Facebook Live video.  Click HERE to see the video.  Join me every Sunday night at 8:00 p.m. Central Time Delightful Fun Facebook Page.

The measurements for the cards are under each picture and the items used are listed at the end of this post.

Card #1 Floral Essence

Card Base - Pineapple Punch Cardstock - 5 1/2" x 11"
Perennial Essence Designer Series Paper - 5 1/4" x 4"
Whisper White Cardstock - 5 1/4" x 4" (for inside of card)
Scraps of Pineapple Punch, Whisper White and Call Me Clover Cardstock


Card #2 Daisy Lane

Card Base - Blueberry Bushel Cardstock 5 1/2" x 11"
Whisper White Cardstock 5 3/8" x 4 1/8" (Front) and 5 1/4" x 4" (Inside)
Scraps for the die cut and punches
Noble Peacock Specialty Designer Series Paper 4" x 5 1/4"


Card #3  Free As A Bird - Double Easel Card


Large easel base - Grapefruit Grove Cardstock 4 1/4" x 11" scored at 2 3/4" and 5 1/2"
5 1/2" x 4 1/4"
Small easel base - 5 1/2" x 2 1/8" scored at 1 3/8" and 2 3/4"
2 3/4" x 2 1/8"
scrap for die cut
Whisper White Cardstock - 2 pieces at 5 3/8" x 4 1/8"
5 1/4" x 4"
2 pieces at 2" x 2 5/8"
scraps for die cut
Bird Ballad Designer Series Paper - 2 pieces at 5 1/4" x 4"
2 pieces at 2 1/2" x 1 7/8"
(The easy way to cut the Grapefruite Grove Cardstock pieces is to cut pieces in half.  Start with you full sheet of card stock, cut in half length wise.  Save one piece and cut the other piece in half.  Save one piece and cut the other piece in half lenght wise.  Save one piece and cut the other piece in half.  Save one piece and the other piece is an extra that you can throw away.  You now have all pieces need and just need to score the 2 that were cut length wise)


Supplies Used


Monday, May 4, 2020

Beautiful You Trio

I have used this retiring stamp set, Beautiful You from Stampin' Up!, for many different occasions.  Here are 3 cards using the same beautiful lady just to show how many different cards you could make with this stamp set.  The dimensions and colors will be listed here but if you would like to see my Facebook Live video on making these cards, go to my Facebook Page "Delightful Fun".  Click here for video.  Join me every Sunday evening - 8:00 p.m. Central Time - for 3 new cards.  If you share the video your name will go into the drawing for the 3 cards made.  Be sure to comment shared!

On this first card, I used the masking technique and the foam brayer rollers to make the back ground.  I stamped the lady on both my cardstock and on a piece of paper (I used a sticky note).  I cut out the one on the paper so that I could cover my lady on the cardstock before using the rollers (I masked it).  I also punched out a 1 1/4" circle from a sticky note paper as a mask for the sun.  The 3 colors of ink used were Blushing Bride, Pool Party and Soft Suede.  I stamped the Celebrate and Happy Birthday Gorgeous in Soft Suede.
(Paper Cut Dimensions are under the pictures).


Cut a piece of Pool Party for base of card - 4 1/4" x 11"
Soft Suede - 2'' x 5 1/4" and 2 7/8" x 3 7/8"
Blushing Bride - 1 7/8" x 5 1/8"
Whisper White - 2 3/4" x 3 3/4" for stamping for front of card and 4" x 5 1/4" for inside of card


On this 2nd card I also used Stampin' Up!'s Daisy Delight stamp set along with the  Daisy Punch for the skirt portion.  I stamped a daisy on a scrap piece of Whisper White cardstock then used a blender pen and Wink of Stella to color it in.  I then just cut the petals off of the inner circle to use for the skirt.  I stamped the lady on a scrap piece of Whisper White in Memento Black, colored her dress and hat with the Light Balmy Blue Stampin' Blend Marker then cut it our using the Layering Ovals. I layered the daisy petals on using the snail adhesive then added 3 Pearl Basic Jewels to the waist band.   I cut out a piece of Balmy Blue cardstock using the Layering Ovals (the scalloped edge ones) to go underneath the white piece.  I randomly stamped daises on my 4'" x 5 1/4" piece of Whisper White in Balmy Blue ink.  The sentiment on the inside of the card is also using Balmy Blue Ink. 


Cut a piece of Balmy Blue for the base of card - 4 1/4" x 11"
Cut 2 pieces of Whisper White - 4" x 5 1/4" (one to stamp the daisies on and the other for the inside)
Scraps of Whisper White and Balmy Blue


I turned this last card into a Graduation Card.  You can use what ever colors that corresponds to the school they are graduating from.  I made one for my Granddaughter using Cherry Cobbler and Basic Black because her school colors were Maroon and Black.  For this card I used the colors for the High School here in my town.
For this card I used the Layering Squares.  I stamped the lady on my colored cardstock so that I could cut out the dress to layer over my lady stamped on Whisper White.  For the hat, I just cut out a small square by hand and trimmed it until it looked right to me.  I only had white twine so I color it using my Stampin' Blend marker to make the tassel.  I cut 3 pieces of the twine long enough so that when doubled over they still had the length needed for the tassel.  I used one of the pieces to tie a knot around the top and attached it to the hat with a glue dot.  I tied a knot using a matching ribbon.  Everything was stamped in Memento Black ink.


Cut a piece of Blueberry Bushel for the base of the card - 4 1/4" x 11" and 4" x 3 3/4" for front
Daffodil Delight - 5 1/4" x 4"
Whisper White - 4" x 5 1/4" for inside of card
Scraps of Whisper White and Daffodil Delight to cut out using Layering Squares


You can shop for any of these items at delightfulfun.stampinup.net
You have until May 22, 2020 to order both the Beautiful You stamp set and the Daisy Delight stamp set.  Both are retiring and will not be in our new catalog.


Monday, April 20, 2020

Flat Pop Up Card


I have been doing Facebook live video's for a little over a year now and although I don't get as nervous as I used to, it still amazes me that I do a flub up on every video.  It may not be something big and some people may not notice it, in fact I don't notice it until someone tells me or I go back and re-watch the video, but none the less, it is there.  For instance, last night I was calling the bone folder a scorer.  Why?  I have no idea.  I know it is a bone folder.  On another video I was doing (thank God it wasn't live so I was able to delete it) I was calling all of the punches, dies.  I promise, I really do know the difference.
Anyway, I found this particular card on Pinterest. "A Stamp Above" had a video on it and I fell in love with the card.  They are fast and easy cards and as in all cards, just changing the stamp and the designer paper you can create beautiful unique cards.

Here are the measurements for the card:
1.  For the bases of the card cut one piece at 4 1/4" x 8 3/8"
     Score this piece at 3/8", 1 3/8", 2 7/8" and 3 7/8"
2.  In a matching cardstock cut one piece at 3" x 4 7/8"
     Score this piece at 3/8" and 1 3/8"
3.  Cut 2 pieces of coordinating Designer Paper one at 4" x 4 1/4" and one at 2 3/4" x 3 1/4"
4.  For the back of the card cut a piece of cardstock (usually the color of the cardstock cut in #2) at
     4" x 4 1/4", this is the matte piece.
5.  Also for the back on the card you will cut a piece of white cardstock at 4" x 3 3/4"

Click Here to watch my Facebook live on how to make these cards.  Also, be sure to watch my videos every Sunday night at 8 p.m. central time.  If you share the video, either watching live for watching during that next week, your name will go into a drawing for the 3 cards that I made in that video.  My Facebook page is "Delightful Fun".

You can order all products at delightfulfun.stampinup.net

Here are front and back pictures of the cards.


Monday, April 13, 2020

Hold On To Hope Trio

I hope everyone's Easter was good.  I had a great Easter even though our usual get together was not able to happen.  It gave me more time to reflect on Easter itself and what Easter is all about.  I do a Facebook Live video every Sunday night and was debating on whether to cancel since it was Easter but decided since everyone is having to stay home at this time in life, I would go ahead with my video.  I choose the stamp set "Hold On To Hope" by Stampin' Up! for the occasion.  Here are the cards I made and the instructions on making them.

I ended up using every stamp from the set on these three cards.  I also decorated an envelope to go with them.  If you would like to see the Facebook video on making these cards you can go to my Delightful Fun page or click here.

The first card I made was the "God Is Love" card.  I used Whisper White, Gorgeous Grape and Purple Posy.  Everything except for the butterfly was stamped in Gorgeous Grape.  The butterfly was stamped in Purple Posy.  Here is the card and the paper measurement are below it.
Whisper White - cut the card base at 4 1/4" x 11" (fold in half)
cut a matte piece at 5" x 3 3/4" (this is also the piece that I embossed using the Subtle embossing folder.
Gorgeous Grape - cut one at 5 1/4" x 4" and one at 3 1/4" x 3 1/4"
Purple Posy - cut one at 5 1/8" x 3 7/8" and one at 3 1/8" x 3 1/8"
Best Dressed Designer Series Paper - cut one at 3" x 3" and one at 2 1/2" x 6" for the flap on the envelope.
Purple 3/8" Tricolor Ribbon - approx. 12 inches long

Stamp the inside of the Whisper White card base with the corner border stamp and the  Hold On To Hope stamp using Gorgeous Grape ink.  Stamp the butterfly with the Purple Posy ink.  Set card base aside.

Layer from top to bottom like this - (square cuts) designer paper, purple posy, gorgeous grape.
Set aside!

Next layer the embossed whisper white, purple posy, gorgeous grape.  Wrap your ribbon around these three mattes and tie a knot.  This can now be attached to the card base.

Attach the 3 square mattes with dimensionals.  The God Is Love banner is stamped on a scrap piece of whisper white and cut out using the Crosses of Hope Framelits.

Card #2 can be used as a Birthday Card, Congratulations Card or anything to celebrate someone.  For this card I used Early Espresso, Daffodil Delight, Melon Mambo and Whisper White card stock.  The ink I used was Early Espresso and Melon Mambo.  I used the framelit dies from Barn Door stamp set for the flowers.
Early Espresso - cut base of card at 4 1/4" x 11 (fold in half) and one piece at 3 1/4" x 3 1/4"
Daffodil Delight - cut one at 4" x 5 1/4"
Melon Mambo - cut one at 3 3/4" x 5"
Whisper White - cut one at 3" x 3" and one at 4" x 5 1/4" for inside of card

Stamp the whisper white inside of card piece with the corner border stamp and the cross stamp in Melon Mambo ink. Be sure to stamp the cross off once on a scrape piece of paper before stamping on the card stock.  (Ink up stamp, stamp on scrape paper the stamp on Whisper White to give it a lighter stamped image.)  Stamp the "You" on the cross using Early Espresso ink.  Attach this to the inside of the Early Espresso card base.  Set aside.

Stamp the 3" x 3" Whisper White with the flowering vine stamp and the Celebrating God's creation stamp in Early Espresso ink.  I die cut flowers using the sliding door framelits and glued them to the flowers on the flowering vine stamp.  I did these from a scrape piece of Melon Mambo card stock.  You can attach this to the square piece of early espresso card stock.  Set aside.

Layer your Melon Mambo on to your Daffodil Delight,  I cut a piece of Daffodil Delight ribbon, approx. 5- 5 1/2" and putting glue dots on each end of the ribbon, attached it diagonally to the bottom right of this 2 layer matte.

I then attached the square mattes to the middle of the large mattes using dimensionals.  Next I wrapped another piece of Daffodil Delight ribbon to the top left corner of the card, again attaching it using glue dots.  I then made a bow and attached it with a glue dot.

You can now attached to the card base.

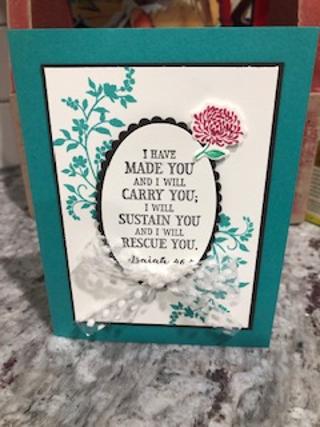
Card #3 is the Isaiah 46:4 verse.  For this card I used Bermuda Bay, Early Espresso and Whisper White card stock and Bermuda Bay and Early Espresso ink.  For the flower I used Stampin' Up!'s Stampn' Write pens in Call Me Clover and Lovely Lipstick colors.  I colored straight on to the stamp, stamped it on to a scrape piece of Whisper White and cut out using the Crosses of Hope Framlits.

I stamped the verse on a scrape of Whisper White and die cut out using the "Layering Oval" dies.  I also die cut a Early Espresso scalloped edge oval to go under the white.

Bermuda Bay - Cut one at 8 1/2" x 5 1/5" for card base.  Fold in half.
Early Espresso - cut one at 3 3/8" x 4 5/8"
Whisper White - cut one at 3 1/4" x 4 1/2" and one at 5 1/4" x 4 for inside of card.

Stamp the flowering vine stamp on both Whisper White pieces of paper.  On the small piece of card stock stamp so that the ends of the vines are going towards the middle of the paper.  It doesn't matter if they overlap because they will be covered with the sentiment matte.  The inside card stock can be stamped more in the corners leaving room to write.

The only thing that I put dimensionals on is the Early Espresso die cut oval and the die cut flower.  Attach Polka Dot Tulle Ribbon bow using a glue dot,

If you would like to order any of the items used for these cards, please go to delightfulfun.stampinup.net

DIY Photo Album

 As promised from my Facebook Live last night, I am here this morning to give you the measurements of the photo album I made.  I am so sorry...