Monday, September 23, 2019

Wicked Card

Today is the first day of fall but the weather here in Texas hasn't gotten the text yet.  We are still in the 90's here.  But since fall is finally here and Stampin' Up!'s new Holiday Catalog is out, I decided it was time to start some holiday cards.  I have not ordered any of the Halloween paper or Stamp Sets yet so I am using the stamps that came in the September Paper Pumpkin kit.

If you are not receiving the Paper Pumpkin Kits yet it may be something to really think about.  For only $22 (plus tax) a month you received a kit perfect for the upcoming season or holiday.  For instance, now in September we received a Halloween kit as you will see in the video below.  Next month will be for Thanksgiving and November will contain items for Christmas, etc., etc.

Here is a picture of the card I made:

Here is my live video from my Facebook page "Delightful Fun".  I do a live every Sunday at 8:00 p.m. Central Time.  Come watch and share my video for a chance to win 3 cards.
Items Used To Make Card:
September's Paper Pumpkin Stamp Set


Tuesday, September 17, 2019

There are so many different ways to make cardstock or designer paper boxes.  I have made many, some using my envelope punch board and others just using my scoring board.  This one that I am going to show you today is using my scoring board but you can use your own way of scoring paper.

For this box set you will need one piece of 12 x 12 designer paper.  The paper I use is from Stampin' Up! and is all double-sided paper.  You can get many different packages of designer paper on sale right now for BUY 3, GET 1 FREE!  Go to www.delightfulfun.stampinup.net.

My video will show you how I put everything together but here are a few additional pictures and measurements.  (Sorry about the shadows!)

The box portion is the left hand side which is cut at 9 1/2" x 12".  You will then cut from the remaining strip of paper, a 2 1/2" x 5" piece and a 2 1/2" x 6" piece and on the remaining 1" piece you will cut it to measure 1" x 2".
So you will have a 9 1/2 x 12 for your box.
                            a 2 1/2 x 5 for your card
                            a 2 1/2 x 6 for your envelope and
                            a 1 x 2 for your tag.  My cardstock for my tag was cut at 2" x 4 1/2" before punching out the top.
 
On the 9 1/2" side, you will score at 2" from both sides.  On the 12" side you will score at 1", 3",        6 1/2", and 8 1/2".  You will then on each side, cut on your score lines up to the 2" score line from the 9 1'2" side.  This will make your flaps to fold the box.  You will cut out and toss the little flap created at the 1" score mark.  (See above picture).
 
Here is how your set will look.
 
You can decorate how you want but my video will show you what I did.  For some reason I am having problems posting it here but you can see it at my Facebook page "Delightful Fun".


Monday, September 9, 2019

Painted Glass Card

The featured stamp set in this how to video is: 
Painted Glass Cling-Mount Stamp Set 148220
Price: $18.00
Old cathedrals, monasteries and monks, medieval manuscripts, your holiday in France, your local church... no matter what this set makes you think of, it is simply beautiful! 

                                                       Here is the card I made using it:

                                           Hope you enjoy making this card and many like it!
 
Items Used To Make This Card


Monday, September 2, 2019

Floral Essence Card

I can not believe it is Labor Day already.  Where has the summer gone, where has the year gone?

It is time to get ready for some more holiday cards and to help with that is our new Holiday 2019 Catalog which becomes available to order from in just a couple of days.  On September 4th you can start ordering from this catalog.  Go to delightfulfun.stampinup.net on September 4th to see the catalog.

For now here is my video on how to make this Floral Essence Card. You can make so many beautiful cards using the Perennial Essence Designer Series Paper.  Below the video I will post the items used.


Items used:
Floral Essence Stamp Set
Perennial Essence Designer Series Paper
Granny Apple Green Cardstock and Ink
Blackberry Bliss Cardstock and Ink
Blueberry Bushel Cardstock and Ink
Whisper White Cardstock
Layering Circles
Country Floral Dynamic Embossing Folder
Rhinestone Basic Jewels
Leaf Punch
Banner Triple Punch
Perennial Flower Punch
Wink Of Stella Brush
You can find these items and more at delightfulfun.stampinup.net
 

Sailing Home Card Week 4

Sailing Home Stamp Set was my stamp set for the month of August.  I did a different card on my Sunday night Facebook lives each week.  This card is the last of the 4.  Below is the video on how to make this card and below the video will be a list of what I used to make it.

Join me every Sunday night at 8:00 p.m. Central Time for my Facebook live videos and a chance to win the card I am making plus 2 others of my choice.  I also post a special on Tuesday's on my Facebook page "Delightfun Fun".  Hope to see you there.
 
Base of card - 8 x 4 1/4 score long side at - 1 1/4, 2 1/2, 5 1/2 and 6 3/4.
Center Section of Whisper White Cardstock is - 2 7/8 x 4 1/8.
Designer Paper for sides - cut 2 at 1 x 4.
Cardstock for bridge is - 5 1/2 x 1 1/4.
Paper to decorate bridge is - 5 1/4 x 1.


Products Used for Card:
Sailing Home Stamp Set
Water Front Stamp Set
Come Sail Away Designer Series Paper
Balmy Blue Cardstock
Whisper White Cardstock
Night Of Navy Cardstock
Balmy Blue Ink
Blueberry Bushel Ink
Night of Navy Ink
Smooth Sailing Dies
2 1/4" Circle Punch
Blender Pens
You can find all these items at Delightfulfun.stampinup.net
Sponges


Monday, August 12, 2019

Sailing Home Card

I just read a little saying on Facebook called "Beware the Menopause Fairy".  It is about her stealing you figure, your mood, your sleep and how she eats at your brain leaving you with nothing but a lousy moustache, a muffin top, hot flushes, a dodgy memory, etc.  Well she sure was talking about me.  Especially the dodgy memory.  I was going to get up and start on my blog first thing this morning.  It is now 10:30 (I got up at 6:30) and I just now remembered about it.  And thus starts the week!!!

I hope everyone had a great weekend.  The temps here in Texas have been over 100 and today it is suppose to reach 104.  Thank God I am able to stay inside.  Bless all the people who have outside jobs, my son-in-law being one of them.  I don't know how they do it.

My video last night was using the Sailing Home Stamp Set.  For this week and the prior week I did a #simplestamping card which is using nothing more than paper and the stamps.  There are no dies, punches, ribbon or any other embellishments on the card.  I found this card on Pinterest and it was posted by Joyce Whitman.  A big thank you to her for posting this wonderful card.

Once you have the measurement for this card, you can use different stamp sets and see what wonderful cards you can come up with.  Below are some samples of different cards I made using the same layout.  Here are the measurements and cardstock colors for the card in the video. 

You can go to delightfulfun.stampinup.net to find items used and many other items in our catalog.

Night of Navy Cardstock
  •   Cut at 5 1/2" x 8 1/2"  score at 4 1/4"  (card base)
  •  Cut at 2 5/8" x 2 5/8"
  •  Cut at 3 1/8" x 3 1/8" 
Balmy Blue Cardstock
  •   Cut at 1/2" x 4
Whisper White Cardstock
  •   Cut at 2 1/2" x 2 1/2"
  •   Cut at 3" x 3"
  •   Cut at 4" x 5 1/4" (for inside of card)
Come Sail Away Designer Series Paper
  •   Cut 2 at 2 3/4" x 4"


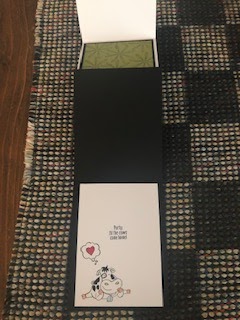
Here is the card that I did in the video.
 
 I used the same layout for this card but used the Free As A Bird Stamp Set.
 Again, the same layout using the New Wonder Stamp Set which can be purchased by hosting a demonstration. 
Same layout using Sailing Home Stamp Set but different paper from the Come Sail Away Designer Series Paper.
 
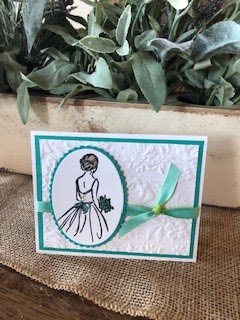
This is the other #simplestamping card I did on my live Facebook video the prior week.
You can find the video on my Delightful Fun Facebook Page.

Monday, June 24, 2019

Buffalo Check Daisy Card

Here is a fast card to do.  All you need is the Buffalo Check Stamp and the Daisy Lane Bundle.  This card would look great in all colors.  Let us see what you come up with.
 

Wednesday, June 19, 2019

Daisy Lane and Over The Moon Card

So sorry everyone.  I am late on getting Monday night's video posted.  I had a card class last night and for some reason it took me the entire day to get ready for it.  It was a good class and below are the cards we made.  I have another class to get ready for on Sunday.  This month is a busy time for me.  Over the past weekend we drove down to South Padre Island for my Stepson's wedding.  It was a beautiful wedding and fun time on the beach but I think I am getting too old and not enjoying the long car trips any more.  It was 11 (including all the stops) hours down on Friday and 11 hours back on Sunday.  In a week I will be going to California for a couple of weeks to visit family.  The airplane will be my best friend on this trip.  I hope all of you are having a fun and safe summer.

This is what we did at my card class last night.


Now here is my Facebook live video and all the dimensions and a list of supplies for the card I did.
Happy Stamping to all.

 
I think my video is too long.  I can't seem to get it to post on my blog.  So if you would like to watch it you will have to go to my Facebook page "Delightful Fun" and view it there.  Sorry about that. 
 
Paper sizes:
Black Cardstock - 4 1/4 x 11  score @ 5 1/2
                              3 3/4 x 5
                              2 pieces @ 3 3/4 x 2 1/2
White Cardstock - 4 x 10 1/2   score @ 5 1/4 and 7 7/8
                              5 1/4 x 4 (for the inside on the card)
Old Olive Cardstock - 2 pieces @ 3 1/2 x 2 1/4
Designer Paper - 3 1/2 x 4 3/4  (I used Bird Ballad Designer Series Paper)
 
You will also need so scrap pieces of Black, White and Crushed Curry Cardstock
 
The ink I used is Black, Old Olive and Crushed Curry
I also used the Layering Ovals and the Stitched Shapes Dies.
 
And of course the stamp sets were Daisy Lane and Over The Moon.


Monday, June 10, 2019

Daisy Lane Card

I am so in love with the new Perennial Essence Designer Series Paper by Stampin' Up!  I know I will probably go through many packages of it.  I would love to get some shadow boxes and just frame some of this paper.  In fact, I am sure I will and I will post some pictures when I do. 

Here is the card I did on my live last night.  Using Stampin' Up!'s punches make a card so fast and easy to make and together with this designer paper you can have the same concept but the cards will look different and all just as beautiful as the first.

Under the video you will find a link to the items used in making this card.  Have a great day!!


Tuesday, June 4, 2019

Daisy Lane Post-It Note Holder

I am always needing something for a friend of mine so that she can give a little gift for her church ladies.  So here is a great little gift that is fast to make and you can decorate it how every you want.
I used the new Daisy Lane Stamp Set and the Daisy Punch along with the beautiful Perennial Essence Designer Series Paper.


Links to items used for the post-it note holder:


Monday, May 27, 2019

Colorful Seasons Card

I hope everyone is having a nice Memorial weekend and a very good Memorial Day.  Thank you to all that have serviced and are currently serving for all of us.

For my card this week I used the Colorful Seasons stamp set and Seasonal Layers, the coordinating thinlet dies.  We are very lucky that this set will be carried over to our 2019-2020 Annual Catalog.  This set is good for all seasons though out the year.  Below the picture of the card is my Facebook live video showing how I put this card together.  Below the video are links to items used for the card.

Be sure to join me on my Facebook lives every Sunday evening at 8:00 central time.  My facebook page is Delightful Fun.

Have a great week everyone.


SUPPLIES USED ON CARD


Jar Of Love Card

Good Monday morning everyone.  I live in central Texas and we have been getting so much rain.  It is wonderful as long as I don't have to drive in it.  I grew up in New Mexico and lived for 10 years in El Paso, Texas where rain is not as abundant as it is here in the Dallas/Ft. Worth area.  (Of course neither are the tornados).  But living in El Paso has made me really appreciate and enjoy the rain.  I love everything green and the further east you go the prettier it is.  We have been lucky with no tornados and not very big hail hitting at our house.  Also, on the days that we have had something planned, we have had beautiful weather.  Yesterday was one of those beautiful days.  We spent the day outside and loved it.  Sitting on the porch with the breeze blowing was perfect.  I know these days are limited.  Soon it will be in the high 90's and up in the 100's for the summer.

After enjoying a beautiful day I came home and did my live video using the Jar Of Love Stamp Set.  I love this set and am sad to see in retiring in less than a month.  I am posting a picture of the card, the video and the supplies used to make the card.  I usually give the dimensions of the paper I am using but forgot to remeasure it out for the video so I will also list that.

I take care of 2 of my grandsons during the week (one is in school and one is at home) and my daughter is a teacher.  It is the last week of school here which means next week I start my summer vacation.  I hope everyone has a fantastic week.


I used Poppy Parade for the base of the card:  5 1/2 x 8 1/2 and fold in half to make a 5 1/2 x 4 1/4 front.  The Basic Black matte measures 5 x 3 3/4  and the Whisper White measures 4 3/4 x 3 1/2.
The Whisper White inside paper is 5 x 4.

The supply list/link is:


Monday, May 13, 2019

Daisy Delight Card

I had a wonderful Mother's Day and hope all of you did too. 

The card I did on my last live was a Daisy Card using the Daisy Punch.  The punch makes it so easy to create some beautiful flowers.  We do also have the Daisy Delight Stamp Set so that you can stamp the daisies before punching them out but on this card I did not do the stamping.  I did stamp the sentiment from the Jar Of Love Stamp Set but that was all the stamping there was.  This is a card you can make in no time as long as you have the punch.


Items used in the card:
Jar of Love Stamp Set - Retiring 4/3/19


Monday, May 6, 2019

One Sheet Wonder

I have been having fun with this one sheet wonder.  I found the dimensions on Pinterest posted by Nicolle Balesimo who had got them from Kathy Roney.  Thanks to both of you for sharing these fun cards.  I used the same dimensions but changed up the cards some to go with the stamps that I had. 

I made the cards on my Facebook live last night and gave all of them away in the Share Drawing.  Be sure to join me every Sunday night at 8:00 central time.  I always have a drawing for those who share the video.

Below are pictures of the dimensions for both the DSP and mattes and of each card.  You can watch the video on my Facebook page "Delightful Fun" to see how they went together.
DESIGNER PAPER MEASURMENTS

MATTE MEASUREMENTS

CARD #1


CARD #2


CARD #3


CARD #4


CARD #5


CARD #5 W/MATTE FOR GREETING

CARD #6


Embossed layer dimensions as follows:
Card 1 - 4"x4"
Card 2 - 4"x4"
Card 3 - 2"x5"
Card 4 - 3 3/4"x 4"
Card 5 - 5 1/4"x4"
Card 6 - 3 3/4"x4"


Thursday, May 2, 2019

Bath & Body Works Sanitizer Gift Box

Spring is here and summer is right around the corner.  Everyone will be out and about more than in the cold winter.  Now is a perfect time to pass the sanitizer around and what better way to do it than in this cute little gift container.  You can make a lot of these in no time at all and pass them to your friends, your little ones team parents, teachers, patients...and the list goes on.  I hope you enjoy making these.  I found the instructions on Pinterest from The Paper Pixie.  Below the video are measurements and a template.

 
Cut a piece of cardstock 4 1/2 x 4 1/2
Line up on you Envelope Punch at 1 1/2" punch and score and at 2 3/4" punch and score.
Follow score lines for the next 2 sides.  Punch and Score
On the last side you will still line up with the score lines but for the 1st punch you will not score.
You will punch and score for the last one.
 
Here is a picture of the template.  The shaded part on the top gets cut off.
On the bottom you will cut up to the score line to create flaps.
 
 
Cut a piece of designer paper at 5 1/2" x 1 7/8" to wrap around box.
I added some tear and tape to attach it in the back.

Monday, April 22, 2019

Coffee Cafe' Gift Card Holder

I hope everyone had a great Easter weekend as I know I did.  On Saturday I watched my 3 year old twin grandsons play T-Ball.  Of course one was not happy because he wanted to keep the ball but they both did very well hitting the ball with the bat.  Then from their little game I walked to another field to watch my 9 year old grandson play ball.  I got a great video of him sliding into home plate.  Sunday was a potluck get together at my daughters in-laws.  She could not have asked for better in-laws.  They have a huge porch and backyard and do many gatherings there.  I of course ate way to much but when everything looks so good you have to try a little of everything including deserts.  It makes my heart happy to be able to sit back and watch all the kids/Grandkids running around playing and having their Easter egg hunt.  It brings back memories of my own kids doing the same only then it was me hiding the Easter eggs.

I did make it home in time to do my Sunday night Facebook live video.  I wanted to be sure to get the message across that many items and some major items are going to be retiring from our annual catalog.  I hope you enjoy the video.  Remember you too could win 3 free cards just by watching on Sunday evenings and sharing my video.  My Facebook page is Delightful Fun.  Like my page and join me every Sunday night at 8 central time.

Below the video are paper measurements and a list/link of items used.

 
             Early Espresso Card Stock - Cut Base 5 1/2" x 8 1/2" and fold in half.  You will also need a 5" x 3 3/4" and 2 1/4" x 3 1/2"  For the inside: 2 1/2" x 3"
Very Vanilla Card Stock - 5 1/4" x 4 and 4 3/4" x 3 1/2".  For the inside: 5 1/4" x 4.  You will also need some scraps for stamping on.
Tranquil Textures Designer Series Paper - 2 1/4" x 3 1/2"      


Major Retiring Items:
(all retiring items available only while supplies last)


A Tab For Everything Gift Card Holder


Monday, April 8, 2019

Easter Greetings Card

Happy Monday to everyone.  I had a great weekend with a Saturday full of Stampin' Up! events held by my #1 upline Jennifer Cotton.  I am so glad to be part of her team.  Now I am anxious for this coming weekend which is the On Stage Event.  I will be going to the one being held in San Antonio.  For those of you who don't know about Stampin' Up! twice a year there is an On Stage (convention) to introduce new catalogs coming out.  There is a lot of learning, a lot of fun and a lot of free new stuff.  We all love free stuff!!!  The "Live On Stage" is held in different places with Local On Stages in other locations.  Last October I was lucky enough to go to Orlando, Florida for  Stampin' Up!'s 30th Anniversary/Birthday On Stage.  As always, it was great.  Starting April 11th through the 13th the Live On Stage will be in Auckland, New Zealand with one day On Stage Locals in New Jersey, North Carolina, Minnesota, Utah, Texas, 2 in Canada, 2 in Germany, France, United Kingdom, Asia and Japan.  You may want to sign up as a demonstrator so that you can enjoy the fun and freebees too!

Easter will be here in just a couple of weeks.  So last night my live Facebook video (which I do every Sunday night at 8:00 Central Time) was on an Easter Card.  It is a simple fast card using a few different stamp sets.  I love how you can use a stamp from this set and a stamp from that set to get what you want.

Underneath the video I will list what I used.  It will be linked to my Stampin' Up! page just in case you would like to order it.  FYI, the new catalog will be coming out in June and these stamp set may retire and not be in the new catalog, so if you want them you better be on the safe side and order them now.

If you would like to sign up as a demonstrator and join my group, the Delightful Fun Stampers, you can go to this link to do so. 
https://ida.stampinup.com/en/?demoid=2160103
You can be a hobbyist and get a discount on your items or make it a business and earn extra income, even free trips.

And if you would like to watch my live Facebook videos on Sunday nights at 8:00 p.m. (central time), you can find me on my Delightful Fun page.

 
Painted Glass Stamp Set - For 2nd card shown.
Stampin' Write Markers - Used on 2nd card shown.


Monday, April 1, 2019

A Note For You Card

If anyone watches my live videos on Sunday nights, you will already know how I messed up the whole thing by my last two words.  If you don't already know you will see it in the video below but I will tell you now anyways.  I said "Love You!" at the end of my video and once I had said it and hit the end button I realized what I had done and there was no going back or no explaining that my daughters and my sister were watching and I was talking back and forth with them and I always tell them that when talking on the phone so it was just a natural reaction.  I didn't stop to think about how many other people would be watching.  I have some splaining to do Lucy on my next video.

With that being said, here is the card I did last night.  I have to give credit to Dawn Olehefske @ Do Stamping With Dawn because I CASED (copied) this card from her.  I changed the stripe on the side from Washi Tape to a 1/2" strip of Wood Textures Paper and I didn't have the Copper Metallic Thread so I used Gold.

I hope everyone has a fantastic week.


Here is a list of supplies used:


Monday, March 25, 2019

Wonderful Moments Bridal Card


This is a card I made while I was at my retreat this past weekend.  I decided I liked it so well that I would do my Sunday night live showing how to make this card.  It is a very easy card (if you have all the supplies).  Here is my video on how to make it and below that is a list of items used.


Supplies Used:
Country Floral Embossing Folder - Free with $50. Ends March 31, 2019


DIY Photo Album

 As promised from my Facebook Live last night, I am here this morning to give you the measurements of the photo album I made.  I am so sorry...